Tutorial - Page 8

Contents
The Report Builder allows you to manipulate database information before it is generated to a report page - this is very handy for the next "trick" that is next.
Our report so far has three columns that break apart the name (last name, first name, middle initial). While this is acceptable, we can make it look much better by formatting the database information before it is printed. Instead of printing information inside 3 FRAMES we will instead print a formatted name inside of 1 FRAME. Not only will it look better, but may also take up less space on the report!
Here is an example of how the report used to print name information:
PRESLEY ELVIS A
and here is how we want it to look:
PRESLEY, ELVIS A
Go ahead and open up the report again; the Report Formatter screen should be displayed. Delete the two frames for First Name and Middle Initial, and also delete the header information for those two columns (to delete a FRAME you right click it, then select DELETE from the popup menu).
Left click the Last Name FRAME inside the DETAIL band; the properties box for that frame should look like this:
[PICTURE _bm38.bmp]
If you examine the old report you will notice that there is a LOT of blank space after the last name. We need a way to clip the empty spaces out of the database field. This is achieved by digging deeper into the Report Builder's bag of tricks, and use a built in function that CLIPs off blank space at the end of a database field. The function called CLIP() does exactly this for us, and here is how to use it.
Go ahead and delete the Contents information inside the "Properties" box for the frame, making it completely blank. Click the button with the flashlight (this is the Dictionary access button). This will display the DICTIONARY onscreen. Not only does the DICTIONARY maintain the database field information for your program, but is also a centralized place for accessing/using the different built in functions that the Report Builder has to offer. Here is screen capture showing where the CLIP() function is located inside the Dictionary:

Go ahead and double click the CLIP(string) entry, which inserts it into the FRAME properties:
[PICTURE _bm40.bmp]
Obviously we aren't manipulating a database field called (string); this is simply telling you that the CLIP() function is used against text strings - you can't use this function on numeric fields. Go ahead and remove the word "string" from inside the '()' symbols, thus leaving you with = CLIP() inside the contents entry field. Left click once inside the '()' characters, then click the DICTIONARY button again to select the Last Name field from the dictionary. Double click the Last Name field, which changes the above screen to look like this:
[PICTURE _bm41.bmp]
Now our frame is going to print the contents of the Last Name field from the database, BUT it will remove all the blank spaces from the end of the field!
We've solved one piece of the puzzle; now we need to combine the last name field with a comma character, and a blank space after the comma. To combine two or more strings together we use the Ampersand (&) character; any text that we want to combine with a database field has to be enclosed in single quotes. So, here is what the Contents entry field looks like now:
[PICTURE _bm42.bmp]
So far so good. We have the last name (with all blank spaces removed), and the comma character added directly after it, with a blank space after the comma. Now it's time to add the First Name field; however, remember that the first name field can also have blank spaces at the end, so we need to CLIP() that field to. We are combining the First Name field tothe existing information, so we also need the Ampersand character to join them together. Go ahead and type in this information:
& clip()
then click inside the '()' symbols where the First Name field will be inserted, then click the DICTIONARY button to display the database fields. Here is our revised screen:
[PICTURE _bm43.bmp]
Now for the last part - adding the Middle Initial. This database field is only one position in length, so we don't need to CLIP() that field - we just need to append it to the rest of the information. We do need a blank space after the last name field though. So, go ahead and type in the ampersand (&) symbol at the end of the Contents string, then add a blank space between two quotes, then click on the DICTIONARY button; select the Middle Initial field to make the Contents look like this:
[PICTURE _bm44.bmp]
Now we need to change the PICTURE for this FRAME; originally it was as long as the Last Name field allowed, which was 20 places. We want to extend this to be as long as all the fields and blank spaces require for the 3 fields. To see how long the database fields are you can use the DICTIONARY:
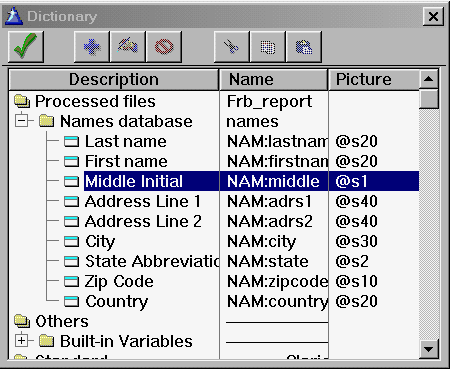
You can use the right arrow to scroll the list to the right in case the PICTURE column doesn't display on your screen. The number after the @S is the length of the field; based on the above information we need to extend the frame to 20 + 2 + 20+ 1 + 1 = 44 spaces. It is doubtful that both the last name and first name would fully occupy 20 spaces apiece, so it is up to you if you want to make the picture shorter.
Click on the tab titled 'Picture'; right now the picture is @S20; go ahead and type in @S34 If you find that some names are being truncated you can increase the length of the picture to accommodate the longer length.
Resize the last name FRAME to accommodate the increased length; you may need to move some FRAMES to the right to accommodate the extra length. Don't forget to change the column header, since it now is the full name -vs- just the last name! Once you have the FRAMES properly aligned save the report, then run it to see how it looks. Here is what the sample report looks like now:
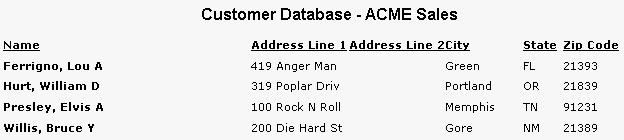
Much better!