Tutorial - Page 15

Contents
There are times when you want to force a page break in a report to make it more visually appealing, or when you need to physically separate different sections of a report for mailing or workload requirements. The Report Builder makes this very easy and straightforward to accomplish.
The first step is adding a Sorting Band to your report; the first sort (or primary sort) should be on the database field that you want to perform the page break with. For example, if you want to separate a report based on the state field, where the start of a new state abbreviation code starts a new page you would create that Sorting Band on the state database field. You can have additional Sorting Bands if you desire, but the FIRST Sorting Band needs to be created using the database field that will be be broken into sections on the printed report.
After adding the Sorting Band you will create either a Group Header or Group Footer detail band in the report. Either band will work as desired; the difference is where contents of that report band are printed. A Group Header band is printed at the top of the page; a Group Footer band is printed at the bottom of the report page.
To create a Group Header or Group Footer band select from the main menu the BAND menu option, then NEW, then the desired Group band. The mouse cursor will change to the hand icon; place the hand icon directly on the first Sorting Band and left click the mouse. A new band (Group Header or Group Footer) is created inside your Report Formatter screen.
Right click on the new Group report band that is newly created, then select the Band Properties popup menu entry. A popup dialogue window appears with various options available to you:
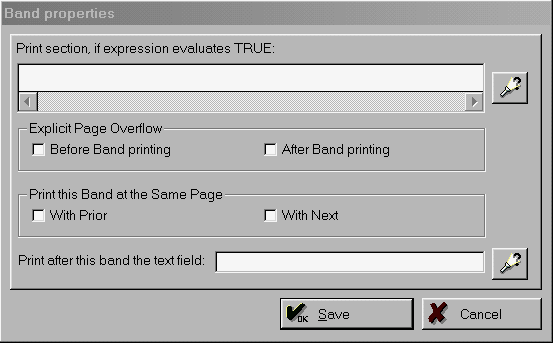
As you can see, the Report Builder gives you a LOT of control on how to print information in the new Group header/footer report band. By default no setup checkboxes are selected
To see how different settings affect the final output let's start with a Group Footer band:

As shown above a frame was created with the text of "State Code: " entered inside it, with the frame borders enabled on all 4 sides of the frame. This will create a nice box effect around the information when printed. Another frame was created that contains the state database field with no frame border. This frame was then moved INSIDE the first frame, which gives an illusion of one large box surrounding both frames!
* NOTE *
Another way of creating a nice box effect around two or more frames that are side by side: for each frame go ahead and set the border to be displayed (use the border buttons that are displayed in the toolbar); for the leftmost frame don't display the rightside border; for the second frame don't display the leftside border.
* NOTE *
Using the default report (used throughout this tutorial) and the above Group Footer information here is how the report output would change based on different settings:
| ¡ | Print Selection, if expression evaluates TRUE: You can elect to only print information contained in the new report band when a specific condition evaluates to TRUE; for example, you may want to make information stand out for customers who are late on a payment; if you have a database field that tracks if their payment is late you could check for this; if late you can create a fancy text warning to draw attention to the account. Naturally you would use the Dictionary to help define the database condition that evaluates to TRUE for this action to occur. |
| ¡ | Explicit Page Overflow Before Band Printing: Print the Group Footer band when the selected database field data changes at the beginning of the next group of information (i.e. ALWAYS print this band when the selected field data changes at the BEGINNING of the next group of information). For example, if you have 10 database records and the first 3 equal "AZ", when the state database field changes value to "CA" the Group Footer is printed on the next page before database records containing State=CA are printed to the page. |
| ¡ | Explicit Page Overflow After Band Printing: Print the Group Footer band when the selected database field data changes at the end of that group of information (i.e. ALWAYS print this band when the selected field data changes at the END of that group of information). The next page that prints will contain new database field information. |
| ¡ | Print This Band At The Same Page With Prior: This attribute specifies that the Detail, or Group Header/Group Footer structure (contained within a Sorting Band) is ALWAYS printed on the same page as the band immediately preceeding it in the Report Formatter screen. This ensures that the structure is never printed on a page by itself, thus eliminating "orphan" bands. An "orphan" band in this case is defined as a Group Footer, or last detail item in a related group of items, that are printed on the following page separated from the rest of it's related items. |
| ¡ | Print This Band At The Same Page With Next: This attribute specifies that the Detail, or Group Header/Group Footer structure (contained within a Sorting Band) is ALWAYS printed on the same page as the band immediately following it in the Report Formatter screen. This ensures that the structure is never printed on a page by itself, thus eliminating "orphan" bands. An "orphan" band in this case is defined as a Group Header, or last detail item in a related group of items, that are printed on the previous page separated from the rest of it's related items. |
| ¡ | Print After This Band The Text Field: This attribute is used whenever you wish to print a database field that is a large MEMO type database field, which are commonly used to contain large amounts of text (such as notes). A normal Frame will be unable to print a memo database field within it's defined space; by checking this feature the selected database field will be printed after the report band in it's entirety without truncation. If there is insufficient space to print all of the information the remainder of the field information will continue printing on the next page. |
To recap: on this page you learned:
•How to force a page break when database field information changes for the current database sort
•How to create a Group Header and Group Footer report band, and the differences of the two
•How to restrict printing a Group Header / Group Footer report band based upon a specific database condition evaluating to TRUE
•How to create an illusion of one frame border surrounding two or more Frames
•How to print a database MEMO field that contains a large amount of information without truncating it's information