Tutorial - Page 10

Contents
Now that our sample report is looking pretty good let's explore some tricks that you can use for your reports. A common report obstacle is printing information that is sorted more than one time. In this module we are going to change the report from printing in Last Name sequence to printing a report sorted first on the State, then the City, then the Last Name database fields.
Back on PAGE 7 of the tutorial we sorted the report on the Last Name field of the report by creating a Sorting Band. We will still use a Sorting Band to perform the sorting - we'll just be using more of them to perform the sorting that we want for the report!
It is important to figure out the correct sequence of events BEFORE you start adding Report Sorting bands to your report. Take a good look at your database information and plan on paper how you want the report to be sorted. This will save you time in the long run, and prevent frustration later on. For the example above we want the report sorted on three different database fields. The most important sort is on the STATE field; within the STATE information we want it to be sorted by the CITY. Within the CITY we want the names sorted alphabetically by the LAST NAME.
The first order of business for this example is deleting the existing Sorting Band that we have created in our sample report. To delete a Sorting Band you place the mouse cursor directly over the words Sorting Band, then click the right mouse button. From the popup menu select 'Delete Band' - the sorting Band is now gone, and the report is unsorted for the moment.
NOTE
If you are modifying your report that already has a Sorting Band created, and have also created associated Header and Footer bands for this Sorting Band you DO NOT want to delete the band! If you want to change the existing sort for a Sorting Band you only need to right click once on that Sorting Band, select PROPERTIES from the popup menu, then modify the field to sort by!
NOTE
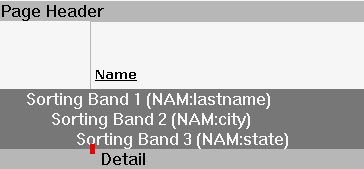
We will be adding Sorting Bands in the same sequence as their order of importance - the primary sort on the STATE field is first, then CITY, then LASTNAME. From the menu select BAND, then NEW, then SORTING BAND. The mouse cursor changes to the hand cursor; place it inside the DETAIL band and left click the mouse. Inside the Sort Expression box you click the Dictionary button, then select the STATE field from the Dictionary, then click SAVE.
Repeat the above steps two more times for the CITY, then the LAST NAME database fields, adding a Sorting Band for each field. The final result will look like this:
You can continue adding more Sorting Bands if you need to; for example, if you wanted the names to be sorted by Last Name, then the First Name you could add a fourth Sorting Band with the database field NAM:firstname selected. Once you are done adding Sorting Bands save the report, then print a sample report to see if the output is what you expected:
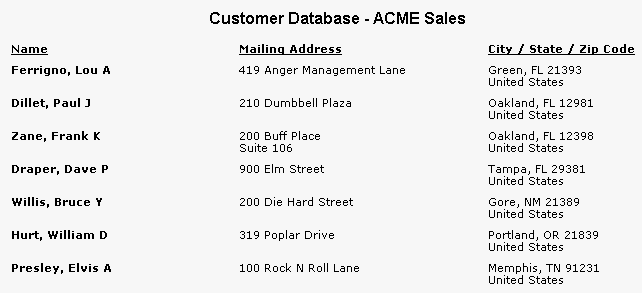
Looking at the information above we see four names of people living in FL; within those 4 names it is sorted alphabetically by the City, and within the 2 people living in Oakland, .Fl the last names are sorted alphabetically. Perfect!
It may take some trial and error to get the information sorted exactly as you want it to print. Remember that you can cause no damage to the database file(s) using the Report Builder, so experiment as much as you want.
An important point to remember about multiple sorts - they will slow down the report generation, as more work has to be done to get the data as you want it to appear. If you have fairly small database file(s) you won't experience much (if any) of a delay; on large database file(s) you will need some patience for the report to be created.